Send me an email (saxowsd@wou.edu).
Attach a photo of yourself, your pet, your
family or whatever. Include "ED421" in the subject. (2
points)
Go to Moodle,
click on Education in the left column, click on ED421 Sax (Denvy Saxowsky
is the teacher), login when it prompts you with the same username
and password used in most WOU programs and Introduce yourself.(2
points)
Go to Skype.com
on your favorite browser, download Skype, register, send me a text
message or give me a call .(2 points)
Go to my
blog, comment on my blog. For extra credit setup your own blog.
(2 points)
Try one or more of the other
forms of socializing and tell me what you did either via that form
of communictaion or with another email. (2 points)
To access thge
brochure, which will give you column guides for a 3-fold brochure, click
here or go to www.wou.edu/~saxowsd/tech/ed421/docs and control-click
on "BrochTempWord.doc ."Save the file to your own computer.
When you openWord, it will show you blue guidelines for placing your
your text in the columns. Important: you must delete these lines before
printing--otherwise, they will show on the final printed copy.
When your design is compolete, place
a copy in your public folder if you you're on campus. (See
instructions to login to your public folder in the Mac Basics.)
Once you have logged in, simply drag your file into the public folder
on you desktop. Otherwise and most importantly. email the document as
an attachmnet to me at saxowsd@wou.edu.
Type in a search term of your choosing and
search for a photograph or image
On the Google page, click on Images nearthe
upper left corner
Click on the image to select it, then click
on the Full-size Image link to select the large view
Drag the photograph to the Desktop
After gathering the three images
Collage: Select one photograph from each category--one from
the digital camera, one scanned image, and one image from the Internet.
Using PhotoShop:
create a collage that combines portions from
each picture (not the entire image except for the background picture)
combine each element carefully to create a
cohesive single image--not simply three individual images on the
same page
use the text tool to add a label to you college
apply at least one Effect to you text
print our a color copy of your final collage
(print to lab ITC001 color)
This is due by January 29.
Week Four (due February 12)
For this assignment, you will
create a short video (approximately 2 minutes) using digital camcorders
and iMovie. Working in pairs or in groups of three, decide on a simple
story-line. Your video need not include diaolgue, though it may. It
can be as simple as a photo-essay about WOU, or as complex as a short
skit. You might consider teaching a process, such as, how to ride
a skateboard, or how to peel an apple. Or you may want to create a
public service announcement.
Use one of the digital camcorders provided in
class to go outside and tape footage you will need. Be sure
to take more than you actually use--enough to have some options.
Connect the camcorder to a computer and capture
your footage into iMovie.
Edit your clips as necessary--shorten or split
them.
Organize your clips on the timeline in the order
you will need them.
Add transitions between clips.
Add a soundtrack or sound effects.
Add a title.
Add credits.
Save your iMovie as a QuickTime movie.
Burn your video to a CD.
Due on February 12.
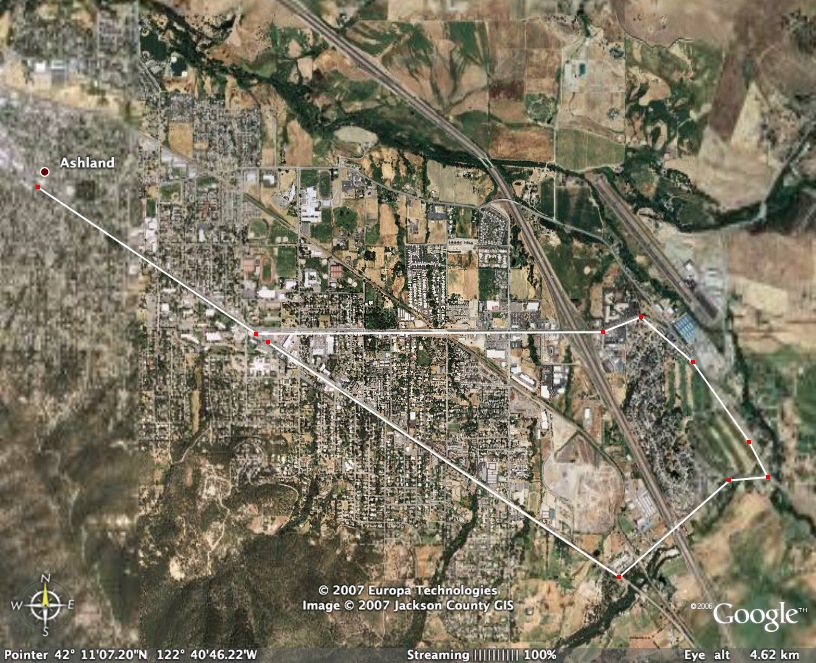
Week Five - Mapping (due February 12)
Create a 5K race for your community
(or Monmouth area).
Try to think of all aspects of setting
up the race course (i.e. room for spectators, staging area for runners/bikers/etc.,
interesting terrain, loop rather than out and back, etc.). Are there
nearby places to stay or camp. Where will you eat? Open Google Earth
and type in your location. Zoom in for details. Show street names
to virtually find your way around.
Under the Tools menu item, select “Measure”.
Next chose Kilometers as your measurement. The curser on the map will
switch to a small “square”. Position the cursor where
you want to start your measurement. Keep clicking along the path and
watch your mileage grow. (Note: if you make a mistake, Control click
on your last entry to delete it.)
You can zoom in or out as well as move
up and down or sideways by using the navigation tools at the bottom
of the screen while measuring your course.
Zoom in or out to fill the screen with
your racecourse. Decide whether to show streets (if it isn’t
too much information). Save the image as
a .jpg. Title it something that you will remember. Open this image in Photoshop
and add a title, your name and any other info that seems appropriate.
Resize if needed to
print. Save as a .jpg file. Print a copy of the
course to turn in. Attach a Word file giving a brief description of
the location, the course, and any other considerations you deem appropriate.
You will turn in a printed version
of your map and a Word document.
Due February
12.
Example:
Week Six - Database (due March 12)
Create a database
that can be used as a mindtool . Databases
must include at least ten fields, ten records, and two layouts. Turn
in the following:
Electronic copy:
When your project is complete
turn in
one electronic copy of your entire database by placing it in a
database folder created by you in the public_html folder in your
personal university folder. Name the folder in the public_html
Database project. Make certain that the document has the proper
trailing extension, i.e. .fp5. Include your name or username in
the name of the document.
an electronic document, using Word, with a short explanation of
how you will use your database to encourage critcal thinking (comparisons,
predictions, estimations, problem-solving, pattern seeking, etc.)
including the questions (queries) you would ask. Place this in
the Database project folder you created in public_html.
Hard copy:
Also turn in the hard copy
(we do need to know how to print and to see how things look on
paper) of
a printout of a page showing your data entry form, and
a second printout of another layout showing a different way of
organizing your data, such as a columnar report.
Using DreamWever
or Netscape 7 Composer, or another approved webpage authroing, create
an educational website with an interactive lesson appropriate for
the authorization and content you plan to teach. Your website should
include:
A homepage to grab attention and introduce your
topic
Links on your homepage to all other pages
At least five additional pages with supporting
information
Home buttons/links on every page
At least two images
Links to at least two websites that students
can access for more information
Before you start building your website:
Create a new folder on your desktop (File>NewFolder)
Give your folder a short name, use ed421
(all small letters) for this class
Name your homepage: homepage.html
Save your homepage to your website folder
Save all pages, as you work on them, to your
website folder
Inside your website folder, create another new
folder to hold your images
Give this folder the name images (all
small letters)
Put all images you plan to use into the folder
before you add them to your website
When your website is complete:
Connect to your public_html by selecting Finder,
then Go, and then Connect to Server.
Select smb://cougar/public_html and enter your
password
After the public_html icon appears on the Desktop,
drag your entire website folder into the public_html
folder in your network folder
Open your web browser and type your personal
URL into the address bar to check your website using the following
format:
www.wou.edu/~your_login_name/ed421, e.g. www.wou.edu/~jsmith03/ed421
Technology-rich Unit of Instruction (due
March 19)
For this assignment, you will
design a technology-rich unit of instruction that would be appropriate
for students in your authorization level and content area. This will
not be a fully-developed unit, but will be an outline that describes
for us the overall learning objective, and the activities you will
use to lead students through the learning process.
Your unit should include at least
five different activities that make use of technology in some ways
to enhance learning. These activities should build upon one another
to support a single unit of instruction and overall learning goal.
If appropriate, you may wish to include additional activities that
do not use technology but are important to the overall outcome.
Here are some ideas of ways that
technology could be incorporated.
students use drawing programs to create posters, brochures, etc.
students create graphic organizers to understand a concept
you introduce or summarize a topic with a computer-generated graphic
organizer
you use Powerpoint to organize and present a lesson
you use technology to bring multi-sensory information into the
unit (sounds, visuals, etc.)
you use a video to illustrate a concept
students use digital cameras to capture relevant images
students create movies about the content
students take video or digital images of their own work and analyze
them
students learn by mapping something
students analyze data using spreadsheet software
students create graphs and charts to analyze and present date
students conduct research online
students evaluate resources found online
students learn by using interactive web resources (educational
games)
students communicate online via email, blogs, online discussions
you bring in primary sources found online (such as the Declaration
of Independence, etc.)
students give presentations using Powerpoint, video, digital images,
etc.
students input information into a databases that supports your
unit
students search or query a database to find information that supports
the unit
you create a website that supports your unit
students create a website to present their findings
This list
contains only suggestions and ideas and is not intended to be complete
or exhaustive. Use it to get your thinking started.
The table
below shows the elements you should be including in your work.
Grade Level
Content Area
Title of Unit
Learning Goal
What will students learn as a result of this unit? This should
be your overall content learning goal (not your technology
learning goal)
Technology Standards
What NETS-S standards are addressed by this unit?
Technologies Integrated
List the technologies used in this unit.
Resources
To the extent possible, list websites, videos, etc. that will
be used in this unit.
Unit Outline
Create an outline for your unit that briefly describes each
activity, including how technology will be integrated. For each
activity, identify approximately how much time will be allotted.
Note: It is not necessary that you use technology to support
each activity, but technology must be integrated into the unit
as a whole. At least 5 activities must incorporate technology.
This week there is a reading
of a chapter that talks about integrating technology into your lessons
using the NETS-S technology standards, and will be helpful as you
plan your unit of instruction. This chapter is fairly long—use
the parts that you find helpful, but pay particular attention to pages
44–48.
Due at the beginning of class during the week
of March 19.
Office hours: Tuesday mornings: 9:00 - noon
Thursday mornigns: 9:00 - noon
Other times aby appointment
Also contact me through email at saxowsd@wou.edu
or denvygail@saxowsky.com