Recording the Narrative Part of Your Video

Hopefully, you are well into writing a draft of your narrative. There is one issue you need to consider when generating the narrative or voice-over for your video. Your product is not being read by your audience, but rather, they will be listening to what you have to say. When writing something people will read, you write formally. Conversely, when writing for the spoken word, the writing should be more conversational. Read this short, but very good, document which gives tips on scriptwriting for recording narration.
Once you have written your narrative, you need to record it to make the voice-over for your video. This actually is not a very difficult thing to do. You will need three things - a computer, a microphone and audio editing software. For this class we are going to use an open source (freeware) program called Audacity for recording your voice-over and any editing of it that you might want to do. This software can do some pretty sophisticated stuff, but the good news is that there isn't a very steep learning curve to be able to generate the audio track for your video. A copy of Audacity has been installed on all the computers in our classroom. However, if you have a microphone (or wish to check one out overnight), you can download the software and install it on your own personal computer. Audacity is a multi-platform program that can be used with either the Windows, Mac or Linux environments. I would suggest that you download the version 1.2.6 which is known to be stable rather than the 1.3.7 Beta version. If you invest about 12 minutes of time to watch the video tutorials I have embedded below, you should have enough basic information to make your voice-over. Note: make sure the sound is turned up on your computer as the audio on these videos is not very loud.
The first tutorial shows you how to set your preferences and make a recording.
The second tutorial shows you how to do amplification, remove unwanted noise and adjust the length of your sound clips.
Some Tips:
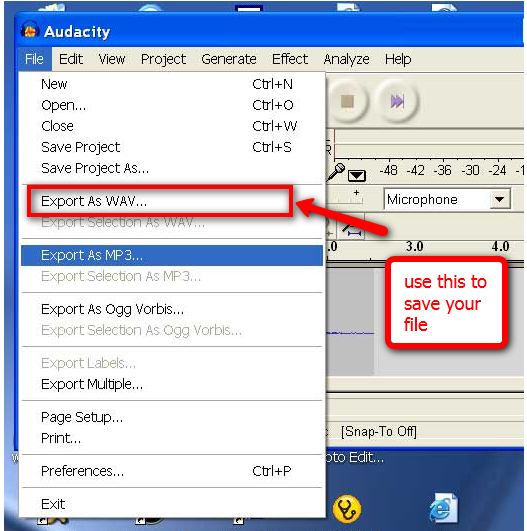
You need to pay attention to the level at which you record your audio. If you have your level set too low, there will be background noise when the volume is turned up for adequate listening. The best type of microphone to use is one that plugs into the USB port of your computer. If you plug into the microphone jack of the computer's sound card, you might get some background noise from the computer's fan which will be enhanced if we need to turn the volume up when showing your video. If the level is set too high, your voice over will be distorted. Use this link to find out how to adjust your recording level. When using a microphone, you want to maintain a constant distance from the microphone, typically about 3-6". The headset/microphone combos are easiest to use in this regard. You do not want to speak directly into the microphone. If using a standalone mike, you want to position yourself so you are either speaking above or below the microphone. When using the headset/combo, keep the microphone below the flow of air you will generate when speaking. Try to speak slowly and at a constant rate and volume. It is suggested that you not drink milk or eat dairy products for a period of time before doing your recording. I don't know what the mechanism is, but it does appear to affect the vocal cords. People who are more professional than we are, tend to avoid these products before recording. You should practice reading your narration before attempting to record it. Make a practice recording by reading a short segment and play it back so you can adjust your levels, microphone position, etc. You can discard the test pieces by using the "Close" option on the File menu. You might need to do a couple of test runs to get everything optimized. One word of caution for when you are done recording and wish to save your voice-over for merging into your project. Saving is done from the File menu. However, do NOT choose the "Save as" option, use the "Export as WAV" option. If you just save it, you'll end up with an ".aup" file that cannot be opened by a video editing program. Saving an Audacity project lets you save unfinished work and re-open it later in Audacity exactly as it was, with all edits and recorded/imported tracks preserved. This is what you would do if you have to stop your Audacity session before you are finished generating your voice-over in final form. You do not want to export your files as mp3 files (requires the LAME compression co-dec which is not on the lab computers). If you were making a podcast, you would convert your audio into mp3 format, a compressed file format, which takes up less disk space and downloads more quickly than the uncompressed WAV format. However, you want a good, crisp voice-over so you don't want to compress it which will lose some of the quality of the recording. To save disk space, you can record your audio as mono rather than stereo. For the spoken word, mono works just fine. If you are using one of the computers in the lab, you can save your files and upload them to your wiki page.