Pre-Project Preparation
Organization of your electronic media materials is very important to your video production workflow. Since you are working in teams, both members of the team need to be able to access your project so we have set up a class folder on the k: drive where you will store all your media files and the Premiere Elements project file. Each team needs to create their own personal documentary folder inside the class folder that will contain a group of subfolders. We will use a naming convention for your main folder which contains the names of both team members in the form name1_name2 (example: courtney_wade). Once you have your main folder, create the following sub-folders:
- video clips
- still images
- narrative
- music
Go ahead and add any other folders that you think will make finding your materials more efficient as you begin to build your video.
Before beginning your documentary, you should populate your sub-folders with the video clips, still photos, and audio files you want to put into your project. It is ok if you don't have all your media when you begin, but you should have the majority of it. Music is something you will probably want to obtain after you have your project just about complete so you know how long your music clips need to be to fit your video. Your audio recording of the story is the foundation of your entire project so your narrative needs be completed BEFORE you begin to edit your documentary. You will record your narrative using a different software program called Audacity. It is as easy to use as a tape recorder. You can save your recorded audio files directly into your narrative folder as you make them. In this tutorial, we will not be working with the long story narrative of your documentary project so we will be using a slightly different workflow. Our goal here is to get you comfortable with using the video editing software.
![]()
Setting Up A Project in Premiere Elements
To start a project, open Premiere Elements on your computer. Premiere will not let you do anything until you save your project. On the opening screen, click the "New Project" icon.

This will bring up a text box. Find your main documentary folder by browsing, select it and type a name for your project in the text box that appears.
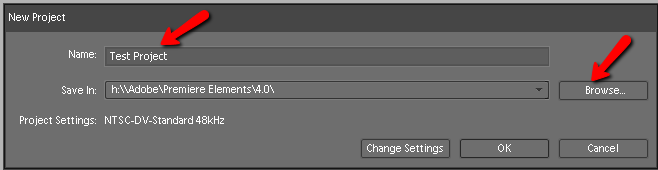
Premiere will load the files and folders into your main documentary file on the Class k: drive that it will need to access throughout your documentary creation process.
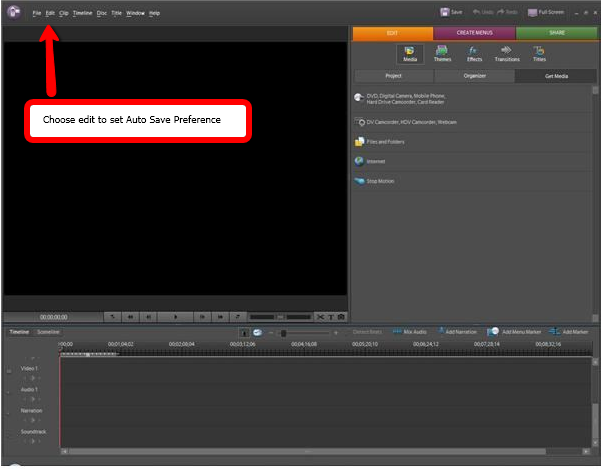
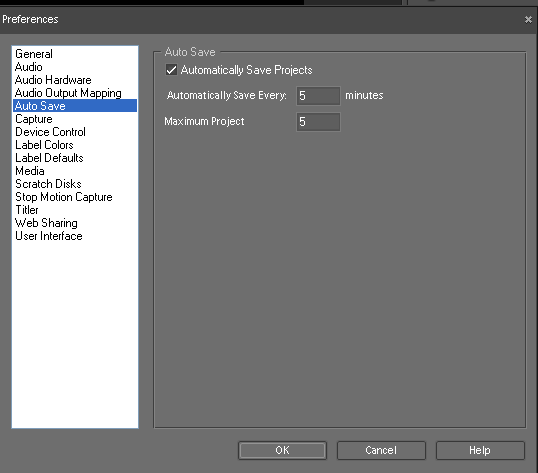
While working on your project, you should save it frequently. The worst thing that can happen is that you work for an hour or more not saving your work and then suffer a computer crash! When you get busy doing your editing, it is very easy to forget to stop and save your work. To make sure a disaster does not happen to you, set up Premiere to auto save your project for you. To do this, click on "edit" in the menu bar and choose "Preferences" from the dropdown menu. Choose "Auto Save" and set the time to 5 minutes. If you take this precaution, the most you will ever lose is 5 minutes of work. Do remember to save your project before closing the program at the end of every editing session.
 |
 |
The Workspace
Once you have initialized your project, a workspace will open which has three different regions - the Tasks Panel, the My Project Panel, and the Monitor Panel.
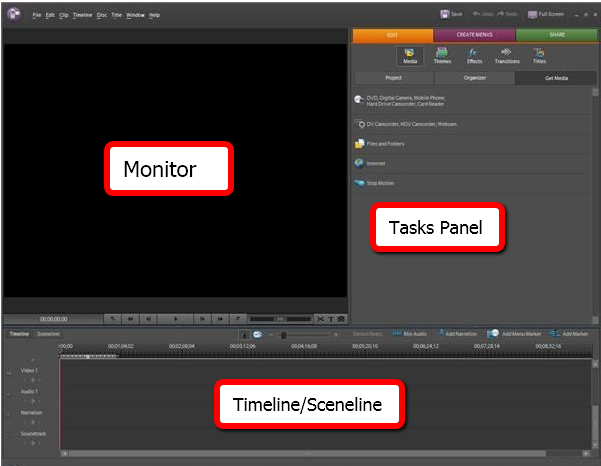 The Tasks Panel
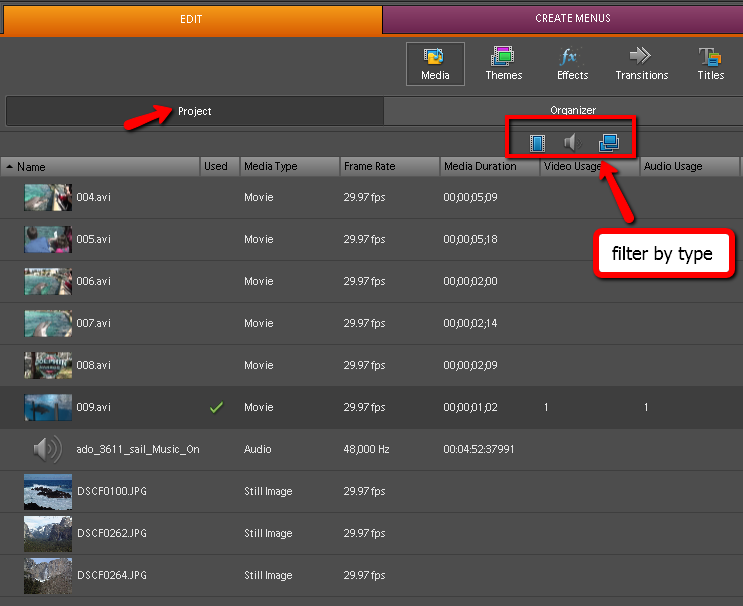
The Tasks Panel is where you will be choosing different tasks to perform on your video. This is where you choose how to get media into Premiere Elements, move your media into your developing video, add transitions and titles, convert your project into a video product and export the file for use. The task panel has three different workspaces - Edit, Create Menu and Share. You will be using the Edit workspace primarily in your project. Edit is divided into five categories - Media, Themes, Effects, Transitions and Titles. The image to the left is showing what the interface looks like in the Media category of the Edit workspace. As you can see, you can work with media in three ways - in Project mode, Organizer mode and/or Get Media mode. What you are seeing in the image is the Get Media mode.
The Project Panel
The Project Panel contains two different modes - the Sceneline and the Timeline. This where you will assemble all your video clips, still images and audio files into your final video. The graphic is showing the Timeline mode.
The Monitor Panel
The Monitor is where you will be viewing your developing video. The monitor will help you with any trimming of video clips that you need to do, is where you will design titles and is where you will see how your transitions look. You will get to see how each of these areas is used through video tutorials in a bit.
You can easily change the size of the panels. To resize the monitor panel, put your cursor on the divider line between two panels, click and drag to the desired size. You can use the same method to resize the Project Panel.
The screen above shows what you will see when you open your project. The Task Panel will open to the "Edit" tab (the orange highlighted tab), and the default task is "Get Media" since you need to have media to use before you can start to make a video.
![]()
Getting Media
The first step in making any video is to get your different types of media into your project. You MUST do all of your editing using only materials in your folder system on the k: drive. Do not remove any files from the k: drive you are using in your project. When you "load" media into Premiere Elements, the files are not physically copied into the project. Only their addresses are added. The actual video and audio is only added physically at the very end during the rendering process. The reason that the files are only accessed during the editing process is that video files are large, and combining a number of big files together makes a really huge file. During rendering, files are compressed to save some file size, but you don't want that to happen until you are done with all your alterations.
Of the four options available for getting media into your project, possibly the only one you will use is the "Files and Folders" option. The "DV Camcorder, HDV Camcorder, Webcam" option is used to import video from camcorders that collect the video on videotape. The "DVD, Digital Camera, Mobile Phone, etc" option allows youimport video into Premiere from an a camera or a card reader attached to the computer. However, if you have captured your video or photos to flash memory such as that of an SD-type card, or if you can plug your camera into a computer via usb, transferring the files directly to your media folders is better than importing via Premiere Elements. The "Internet" option just brings up a browser through which you can search the internet and presumably import pictures into your project. Again, it is better to save them to one of your folders first.
To see how you get media files into your project, you are going to watch a section of a training tutorial. There will be some mention of tutorial lessons that you can ignore. What is important is the demonstration of how you use the software to get your media. Click here to open the video in a new window.
![]()
Although you can work with your media in either the project or organizer view, the project view is the more powerful option.
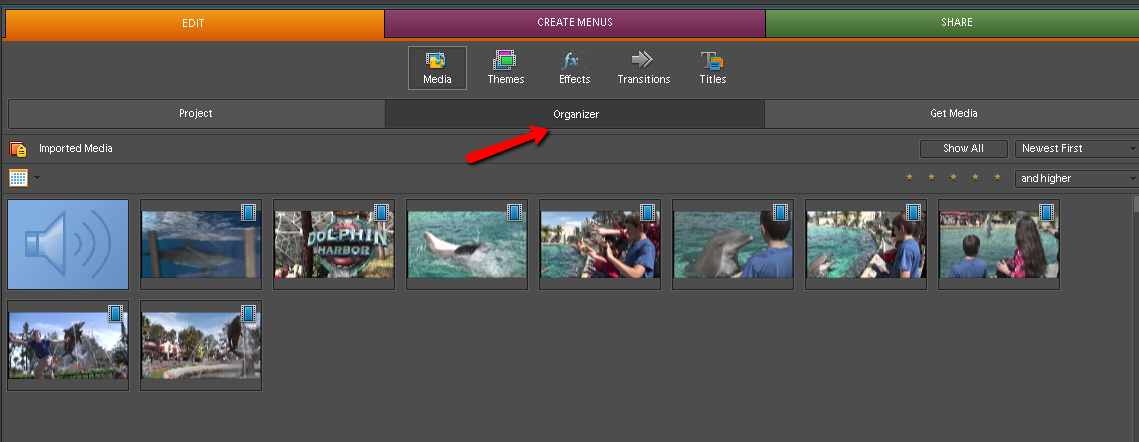
 In the project view all of your media is shown as a list with a lot of information about the particular media clip such as its type and duration if it is a video clip. When you have added a particular clip into your project, a green check appears showing that it has been used. If you are looking for a particular clip, you can filter by media type. This is very useful when you have a lot of video clips, still images and audio clips. To further organize your media, you can add folders, via the folder icon at the bottom of the task panel.
![]()
Assembling The Video
Once you have added media to your project, it is time to begin assembling your video. In your project, I would suggest making your narrative track first and then matching your visual media to the narrative. Nonetheless, most of your work in Premiere Elements will involve working with the visual part of your video - ordering clips, making transitions between the pictures and video clips and adding titles and credits. To become comfortable with the general process of video editing, you are going to watch a few more tutorial segments that follow the one you watched on getting media into Premiere. These tutorials will use the Sceneline for editing which works fine if your project is only going to have audio that is a mix of interviews and narration or music which you can tailor to your video footage. The Timeline mode is a better option if your project is audio driven. Watch the following tutorial segments. Each tutorial will open in its own window which you can close after you are finished viewing it.
![]()
A few thoughts on using transitions and effects in your documentary. Be careful when choosing transitions. Remember, you are trying to tell a story. While some of the transitions available in Premiere Elements are really cool, they can distract the viewer unless that particular transition makes sense with the story you are trying to tell. Transitions should be used with a purpose. One of the film most commonly used transitions which provides an effective bridge from clip to clip is the cross dissolve. This type of transition is added between two clips. A transition that begins on one clip and ends on an adjacent clip is called a two-sided transition. If you are using a transition into the first clip or out of the last clip, you would use a one-sided transition. This one- sided transition is sometimes called a fade-in or fade-out.
The same logic can be applied to the use of effects. If the effect will add to the point you are trying to make or the mood you are trying to create, use it. If it will distract the viewer from what you are trying to say, leave it out.
Music can be very useful tool for adding mood to a story. Watch the following two short clips to see how the style of music sets a different mood for the video footage.
Iceland Geothermal Features from Arlene Courtney on Vimeo. Some geothermal features from Haukladur, Iceland |
Hvergerdi Geothermal Features from Arlene Courtney on Vimeo. These are some of the geothermal features that allow Hvergerdi (Iceland) to be the town of greenhouses where fruits and vegetables can be grown all year long. |
![]()
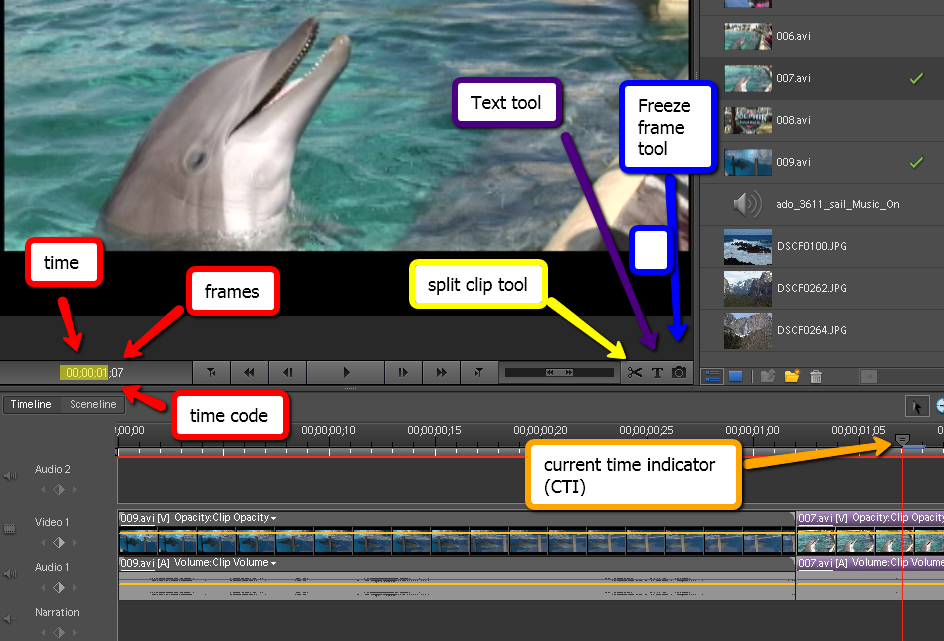
Now that you have some familiarity with the features of Premiere Elements using the Sceneline, let's look at some tutorials that incorporate using the Timeline. The Sceneline is the default editing mode and is intended to provide a simple way for anyone to make a video. The Timeline has more advance features to allow you to make a video that is quite professional. Unfortunately, the next tutorials use Premiere Elements 3.0 which has a somewhat different look to its user interface. They do present a lot of great information, and I think you will be able to apply what is presented in the tutorials to your version of the software. The first tutorial shows how to organize clips and add transitions. The product at this stage in the video editing world is called a "rough cut". The presenter will also refer to getting video from the B-roll which again was a term used for a tape reel were additional footage was stored. When people made movies using film they stored material on two different film rolls. The primary reel of film contained the main parts of the story and the second reel or B-reel contained additional material that could be inserted during the editing phase. In the program that the tutorial presenter is creating, his primary video materials are interviews and the material on the B-roll contains extra visuals that he will use to flesh out his movie. The annotated graphic below will show you where some of the tools used in the tutorial will be located on the Premiere Elements 4 user interface. View Making the Rough Cut.
Next is a tutorial on titling. It will give you an idea about different ways to add text for titles, credits and other uses in your video. Again, this tutorial was made in Premiere Elements 3, but you will be able to adapt the procedures for your project. View the tutorial here.

Media File Types Supported By Premiere Elements 4.0
You can use a wide range of file types in Premiere Elements. If a file you want to use is not on the list below, you cannot use it in Premiere without converting it a file type on the list. If you run into a file that does not seem to work, let us know. We might be able to do a conversion to make it usable.
Video:
-
AVI Movie (.avi)
-
Flash (.swf)
-
Filmstrip (.flm)
-
MPEG Movie (.mpeg, .vob, .mod, .ac3, .mpe, .mpg, .mpd, .m2v, .mpa, .mp2, .m2a, .mpv, .m2p, .m2t, .m1v, .mp4, .m4v, .m4a, .aac, 3gp, .avc, .264)
-
Windows Media (.wmv, .asf)
-
QuickTime Movie (.mov, .3gp, .3g2, .mp4, .m4a, .m4v)
-
DV Stream (.dv)
Note: To import video from mobile phones (.3gp and .mp4) you must have the most recent version of QuickTime installed on your computer.
Still Images:
-
Adobe Illustrator® Art (.ai)
-
Adobe Premiere Elements title (.prtl)
-
Bitmap (.bmp, .dib, .rle)
-
Compuserve GIF® (.gif)
-
Encapsulated PostScript® (.eps)
-
Fireworks (.wbm)
-
Icon (.ico)
-
JPEG®, JPEG 2000 (.jpg, .jpe, .jpeg, .jfif)
-
Macintosh PICT (.pct, .pic, .pict)
-
PCX (.pcx)
-
Pixar Picture (.pxr)
-
Adobe Photoshop® (.psd)
-
Portable Network Graphic (.png)
-
RAW (.raw, .raf, .crw, .cr2, .mrw, .nef, .orf, .dng)
-
TIFF® (.tif, .tiff)
-
Truevision Targa® (.tga, .icb, .vst, .vda)
Audio:
-
Advanced Audio Coding (.aac)
-
Dolby® AC‑3 (.ac3)
-
Macintosh® Audio AIFF (.aif, .aiff)
-
mp3® Audio (.mp3)
-
MPEG® Audio (.mpeg, .mpg, .mpa, .mpe, .m2a)
-
QuickTime (.mov, .m4a)
-
Windows Media (.wma)
-
Windows WAVE (.wav)
![]()
The Asssignment
First you are going to set up your personal folders on the Class Drive k: in the folder titled GS203H_Spring_2011. You also need to complete the Audacity tutorial which can be accessed from the link on the class Moodle site. Once you have completed those tasks, you are going to experiment with Premiere Elements to generate a short mini-project video clip. You can choose to have your mini-project tell a story, but that is not a requirement of the assignment. We have provided some segments of video for you to use in the courtney_wade folder in the GS203H_Spring_2011. There also are a group of DVDs containing Royalty Free video clips from the Footage Firm. Each member of the team is to make a short narration-style audio recording. This recording is not to be off-the-cuff talking into the microphone, but is to be a paragraph that is read. This is what you will be doing when you record your documentary's narrative so you should give it a try now. You may use your abstract for this purpose if you would like, but feel free to write something else. Your mini-project needs to have each of the following components included:
- a title
- a section of video from the courtney_wade folder, creative commons video from the internet or your camera or smart phone
- a section of video from the Footage Firm
- at least one still image obtained from Flickr that is in the Creative Commons
- at least one still image obtained from the internet (source other than Flickr) that is in the Creative Commons or Public Domain
- at least one section with text other than the original title or credits
- two-sided transition between each clip in your video
- one-sided (fade-in) to your title slide
- one-sided (fade-out) to your credits
- rolling credits
- two "narrations"
- optional: still images you have obtained with a camera or smart phone
You may experiment with themes, effects and/or try out some of those cool, but perhaps not so great for documentary, transitions. This is more of a fun, learning project than a serious documentary. You may take some of your own video if you would like to try that. Phones, Flip cameras, iPod Touches, etc give quite good footage.
![]()
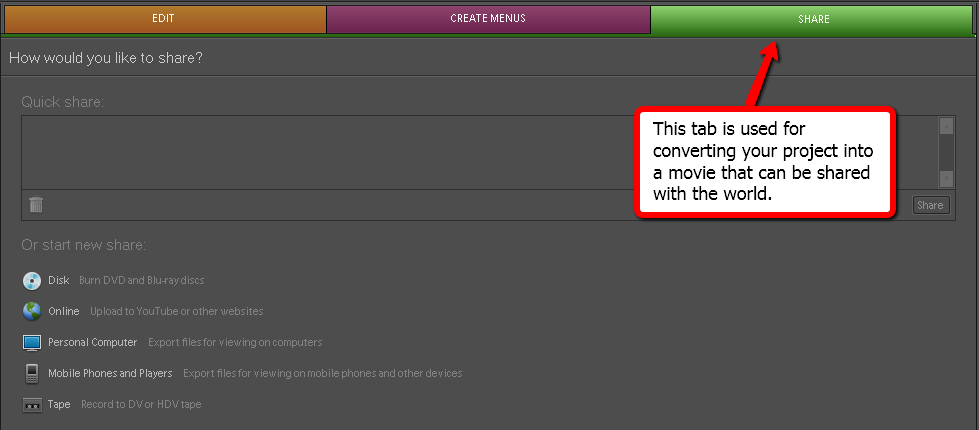
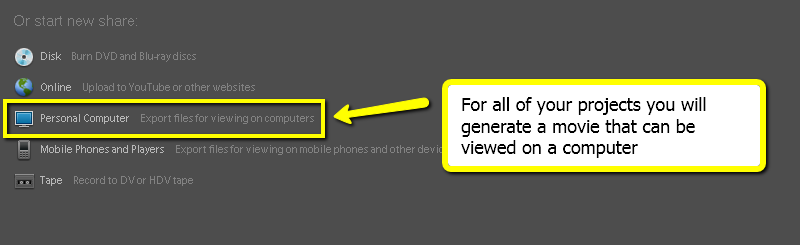
Once you have completed your mini-project, you need to convert it into something that we can all view. Premiere Elements allows you to generate a movie for playback on different types of devices for different applications. To make your project into something viewable, you use the "Share" option in the Task Panel. When you click the Share tab in the Task Panel, you will see the following screen which gives you options for converting your project into different file types.
You will be generating movies that can be viewed on a computer so choose the "Personal Computer" option.
When you choose the "Personal Computer" option, you will be presented with a number of choices. If you think you might want to do further editing of your project, select DV AVI. This will not do a lot of compressing. This option is useful if you are producing a long video and working on it in segments that will be joined together followed by some additional editing. Flash video is useful for embedding video on web pages. However, Flash is problematic for people using Apple i-devices such as i-Phones, i-Pod Touches, and i-Pads. Videos in flash format are not readily viewable on those devices. Quicktime (obtained when you scroll down from what is shown in the image below) is a great movie format but is problematic for some Windows users unless they have downloaded a Quicktime viewer. We will use the mpeg format as it is more or less universal.

When you choose "MPEG", you will get a screen with options that you can edit. Since you are new to video editing, just use the presets. They will give you video that will be fine for all your uses. You will need to type in a file name for your movie file. Always put your name in the file name for any assignments you do in this class. Save your video to the class folder. A word of warning - the export process can take a long time. For your mini-project, it should be completed in a few minutes. For your longer documentary, it will take more than a few minutes to render and export the project. Make sure you leave yourselves sufficient time to do exporting in your work schedule.

![]()
In addition to your mini-project video clip, you need to turn in a written list identifying where you got each of the sources that you put into the mini-project and the copy of your two mini-narrations. Your finished project should be in the 2-5 minute range. Have FUN!
![]()